This section is a reminder of how Conquest III Web Sites were created before version 3.0330 and the Management Console. It is purely for reference.
Make sure that the prerequisites to installing Conquest III have been met
The Conquest Installer always implements Application User passthrough authentication.
Install Conquest III as follows:
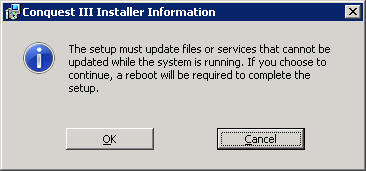
Step 1. If Conquest III is already installed, use IIS on the Web Server to “Stop” the Conquest III Web Site, otherwise uninstalling it could require the server to be restarted, which may not be possible until after hours, e.g.:
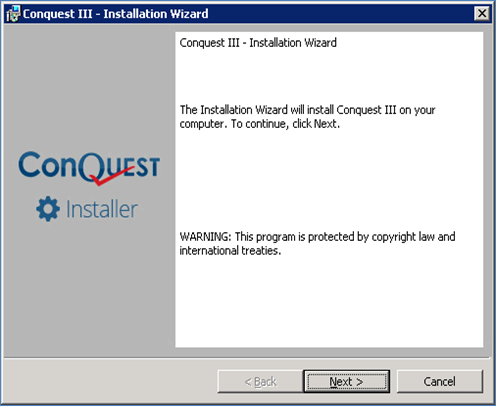
Step 2. Run the Conquest III Installer, either:
•a. With the MSIExec tool
Examples:
|
Type of Install |
Command Line |
|
1. Windows Installer form. Interactive Mode |
msiexec.exe /i "…Path\Conquest III 3.0330.msi" |
|
2. Windows Installer form Interactive but with pre-sets for: •Application Path •Web Site Name •Web Site Port |
msiexec.exe /i "…Path\Conquest III 3.0330.msi" INSTALLDIR="C:\Inetpub\Conquest\CQ30212" IIS_WEB_NAME="Conquest_III_0212" IIS_WEB_PORT="99" |
|
3. Silent mode (/qn). Uninstalls earlier version then installs with pre-sets for: •Application Path •Web Site Name •Web Site Port |
msiexec.exe /i "…Path\Conquest III 3.0330.msi" INSTALLDIR="C:\Inetpub\Conquest\CQ30212" IIS_WEB_NAME="Conquest_III_0212" IIS_WEB_PORT="99" /qn |
|
4. Silent mode (/qn). Uninstall Conquest III |
msiexec.exe /x "…Path\Conquest III 3.0330.msi" /qn |
|
|
|
•b. From Windows
•By double-clicking the MSI file
•Click ‘Next’ to accept the publication warnings and acknowledge the caution from Windows User Account Control, should it be given:
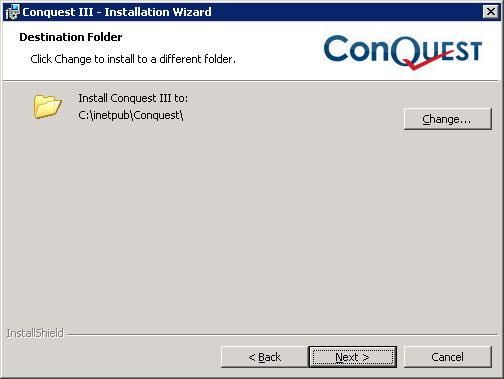
•A default application software path is offered. To choose a different path, click the “Change…” button and select a path accordingly:
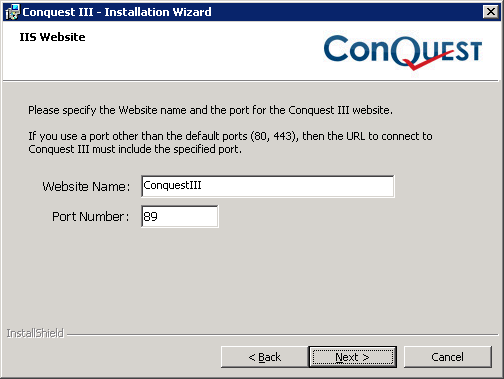
•The Web Site name (default “ConquestIII”) and a Port Number (Default 89) can be changed to suit. It is recommended that the name does not contain spaces:
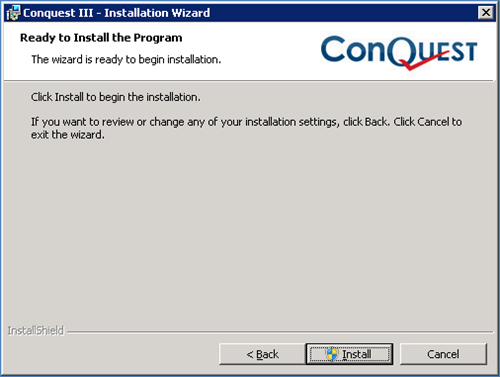
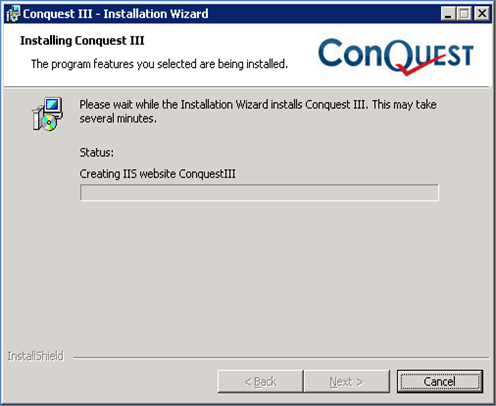
•That’s all the input that the Installer needs. Click “Install” for it to:
•Remove files of an earlier installed version, if any. Except for files in the App_Data folder, which are preserved
•Copy in files
•Create the ConquestIII Web Site
•Create the ConquestIII Application Pool (reuses it, if it’s already there)
•Assign the ConquestIII Application Pool to the ConquestIII Web Site
•The Conquest III Web Site is now installed, ready for the remaining configuration and testing steps
•If there is an updated Integration Module, its files must be copied to the Conquest III application path, ‘…\App_Data\ClientReference’ and ‘…\App_Data\ServerReference’ folders, as per instruction from a Conquest Solutions Support consultant
Step 3. If this is a first time installation, create at least one connection:
•Use the Connections Utility and configure a Connection to the Production Conquest database and to a Test Conquest database
Step 4. If Application User (pass-through authentication) is not suitable then , Service Account Authentication must be used.
Step 5. If this is a first time installation:
•Make sure that the Report Server Prerequisites have been met
•Set up Reporting Services
Step 6. Test Conquest III on a client workstation Web Browser, configured as per the Workstation Prerequisites:
•Enter the Conquest III address (URL) to into the Web Browser address bar. Note: as this is the first use of the new version, a delay is normal, while the Browser Cache and Silverlight Cache are loaded
•Select the Test Database Connection
•Use the Asset Explorer and open the Asset Form for an Asset that has; Inspections, Assets, Actions, Defects and Documents.
•In each of the Form Tabs open an item, including Opening and Adding and deleting a document attachment
•Use the View Manager to open a View and open a Form by double-clicking on a Result List item
•Use the Reports option to run a Report
•A Conquest Administrator can test that the Knowledge Base Explorer, Standard Items and Tools available and work as expected
•Where there are Conquest Extensions for validation and interfaces, at least one of each of these should be tested to work as expected
•Where there are Conquest Extensions for integration with other applications, they must undergo user acceptance tested to ensure that they work to specification
•Where there are custom Integrations with other applications, they must undergo user acceptance tested to ensure that they work to specification
•The basic testing described above, does not constitute full User Acceptance Testing. See the Conquest Solutions Recommendations below.
Things to be aware of:
•Conquest Solutions recommends that:
•Customers keep, up to date Acceptance Test Plans, to use in ensuring that Asset Management requirements, that are dependent on new or changed functionality of a Conquest Release, are met
•Not all Acceptance Test Plans will need to be used with every release, so some direction from a Business Analyst working with the Asset Management and Conquest Support Teams, is a good way to prepare for testing
•Patch releases, which will occur from time to time, to address highly specific issues, will require little, if any, acceptance testing
•Conquest III is installed as a Web Site to make it independent of other software, which might be installed as Applications under the Default Web Site. It can easily be moved.
•When installing Conquest III, if there is an existing, earlier, published, version of Conquest III installed, it will be detected and uninstalled except for the App_Data folders and contents, which, because they contain customer configurations and settings, are kept for reuse
•If the same version of Conquest III as is being installed, is already present for some reason, it must be uninstalled first by using the Windows “Programs and Features” tool
•Every Conquest III Upgrade has a unique version. Conquest III on the client PC uses the Browser Cache to improve performance and store management data from the Server Side. Whenever a Conquest III session starts in a Browser, one of the first things it does is to check that the version number hasn’t changed. If it has then Conquest III on the Client PC displays a progress bar entitled “Refreshing System Objects…”, while it refreshes the Conquest III Browser Cache
•It is not possible to install an earlier version over a later one. The later version must be specifically uninstalled first by using the Windows “Programs and Features” tool
•From Conquest III version 3.0300 onwards the Application Pool uses a Specific Time to Recycle. Earlier versions used the IIS default Recycling settings, which could allow IIS to Recycle the Application Pool, while Conquest III was using it, causing an unhandled error. To avoid the possibility of this happening for versions before 3.0300, it is recommended that the Recycling Interval is manually changed to a Specific Time outside of normal office hours
•For the greatest flexibility it is recommended that a permanent Web Site is manually created to host the Production version of Conquest. Manually created Web Sites cannot be accidentally uninstalled by the Conquest III Installer
•The Conquest III Installer is signed with a certificate for Conquest Solutions Pty Ltd, which can be preinstalled on the server that will be host to Conquest III. This will stop security issues that might otherwise arise. To do this:
•Open the Conquest III Installer .MSI file, Properties Window
•Select the Digital Signatures tab
•Select the Conquest Solutions signature item in the list box and click the Details button
•In the Digital Signature Details Window, click the View Certificate button
•In the Certificate Window, click the Install Certificate… button
•Follow the steps in the Certificate Import Wizard to import the certificate into the Trusted Root Certification Authorities store
•Accept the Security Statement
•Follow the remaining prompt to finish the Import
•Conquest Solutions recommends the use of a Virtual Web Server to host each instance of Conquest III, which simplifies the management of Dev/Test/Production environments. However, not everyone can do this.
•For customers who want to install an upgrade version of Conquest III for acceptance testing, on the same Web Server as the Production instance, the one-step process of installing and using Conquest III for the production environment is not suitable
•If Conquest III is to be accessed via HTTPS then the Web Server will need
to have an identification Certificate (provided by the Active Directory Domain
Controller) allocated to a Port. The Conquest III Web Site to be accessed via
HTTPS must then have the Certificated Port bound to it
The setting up of
firewall rules, to allow an HTTPS Certificated application to be accessed from
the Internet, which varies from one Organisation to another, is outside of the
scope of this document
•On rare occasions a software component may require to be replaced or included in the Conquest III application. In this case there will be specific instructions from Conquest Support. Neither the Web Server nor IIS will need to be restarted but the Application Pool for Conquest III will need to be Recycled. Any client sessions will get a Reset message as a result of the Recycling but can click OK and continue
Application User (pass-through authentication)
When Conquest III is installed, the Web Site uses ‘Application User (pass-through authentication)’ by default. This form of authentication uses the Kerberos protocol and is recommended by Conquest Solutions because it:
•Improves security of the data used by Conquest III inside the network
•Meets the requirements of Customers using third party applications needing individual User Accounts to identify data from Conquest
•Has advantages as follows:
•It is a newer technology than NT LAN Manager (NTLM)
•Is Faster than NTLM
•Uses Mutual Authentication – client to service/service to client
•Is Open Standard
•Uses Delegated Services to decrease the opportunity for misuse/mischief.
•Is Smart card logon capable, which protects passwords
Before installing Conquest III for the first time, set up the servers hosting it, to use Kerberos Authentication. Although the initial set up in Active Directory is complex, once done it will rarely need changing.
Once Kerberos Authentication is set up, it will persist and will allow future Conquest III versions to be installed and run “out of the box” on the same Web Server, with no further configuration, until such time as the Active Directory Servers involved with Conquest III are significantly reconfigured.
The Active Directory administrator must be able to configure the following:
•Active Directory for Application User (Pass-through authentication)
•The Public Firewall, if Conquest III is to have public access. See Publishing Conquest III on Forefront TMG for details
•IIS
•SQL Server connection
•SQL Server Reporting Services
If Application User Pass-through authentication is not required then Service Account Authentication must be used
Set authentication for User Pass-through as follows:
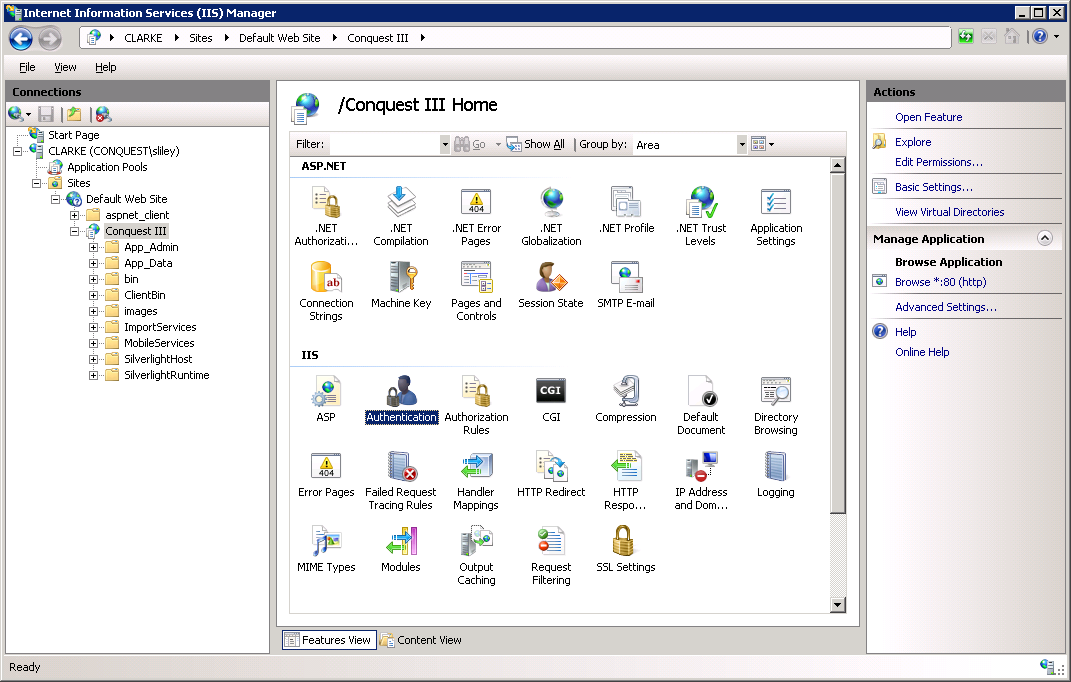
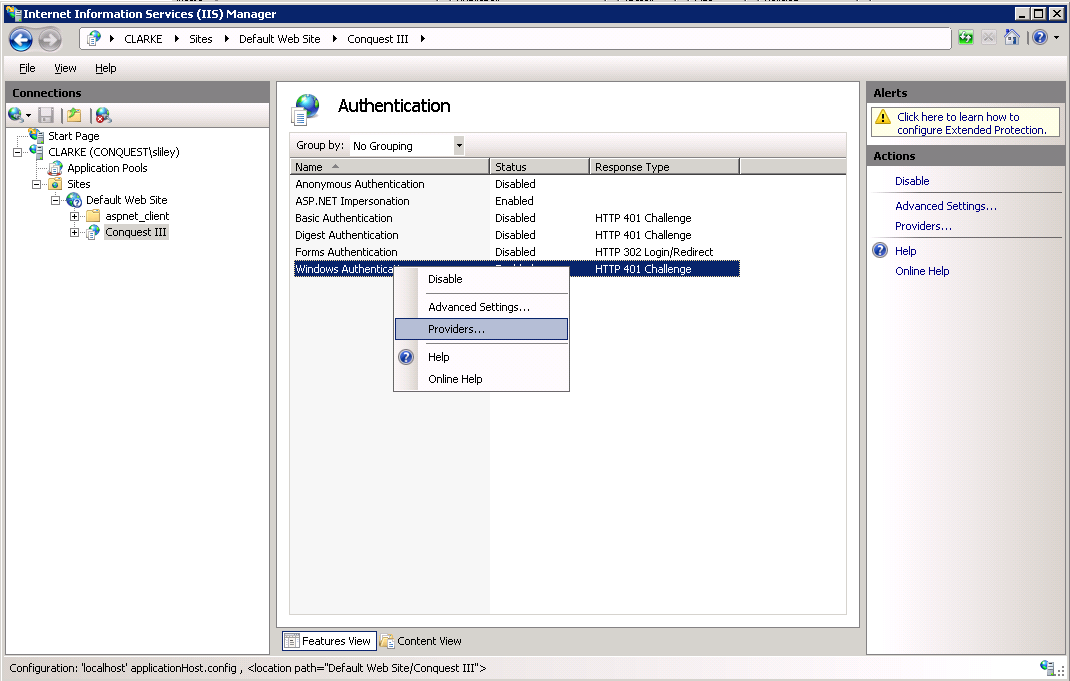
Step 1. In the IIS group, open the Authentication Feature, which shows the Authentication options.
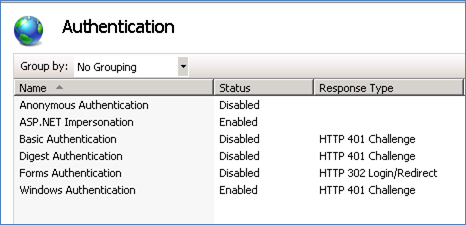
Step 2. Double-click on the “Windows Authentication” option to see the Authentications. This image shows them as set by the Conquest III Installer.
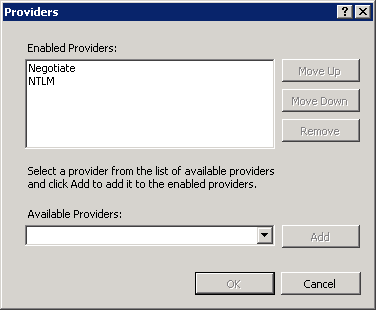
Step 3. Right-click on the “Windows Authentication” option and from the Drop-list select the “Providers…” option:
The Negotiate option must be at the top of the list. If it isn’t, select it and use the Move Up button until it is:
Set Up Permanent Conquest Web Sites
When a standard “ConquestIII” Web Site is being used for production, installing a later version on the same Web Server will uninstall the existing version before installing the new, even if a different name and application path is given to it.
A safe practice is to have one or more independent Web Sites, which this Help Section describes.
The following scenario starts with a Web Server dedicated to Asset Management e.g. “AMCQ301” with:
•Conquest III installed on it as “ConquestIII”
•Using Application Pool “ConquestIII”
•The ‘Default Web Site’ has been bound to Port 8081
•“ConquestIII” Web Site is bound to Port 80
•The Asset Management Production database Connection has been created as “ConquestProduction”
•The Web Browser URL being used by Asset Management for their Production work is “http://AMCQ301”
Set up an independent Production Web Site:
Step 1. Advise the Asset Management staff that Conquest will be unavailable for a short period
Step 2. In IIS stop the ConquestIII Web Site “ConquestIII” on port 80, which is for example, version 3.0325
Step 3. In IIS Change its Port binding to 89
Step 4. Copy the contents of its application path folder to a new path suitable for Asset Management Web Sites e.g. from:
•“C:\InetPub\Conquest III”
•to
•“C:\InetPub\Conquest\Production”
Step 5. In IIS create a new Web Site for the production version e.g.
•Web Site name “ConquestProd”
•Bind it to Port 80
•Set the Application path to “C:\InetPub\Conquest\Production”
•Set the Application Pool to ‘ConquestIII’. All Conquest Web Sites can share the ‘ConquestIII’ Application Pool, which persists even after Conquest III is uninstalled
•Set the permissions for the “ConquestProd” Web Site as per IIS Permissions
•Start the “ConquestProd” Web Site
Step 6. On a workstation with Silverlight 5.0, check the “ConquestProd” instance using Internet Explorer 11 or later, with the Production URL, http://AMCQ301 and connecting to “ConquestProduction”
Step 7. Advise the Asset Management staff that they can resume their Production work using “http:// AMCQ301”
Set up an independent Acceptance Testing Web Site:
Step 1. Install a later version of Conquest III for acceptance testing for example, version 3.0326. The install process will replace the existing “ConquestIII” Web Site and use the following defaults:
•Web Site name “ConquestIII”
•Application Pool name “ConquestIII”
•Port 89
•Application path “C:\InetPub\Conquest III”
Step 2. In IIS stop the “ConquestIII” Web Site
Step 3. Copy its application path folder to a new path in the Asset Management Web Sites group e.g. from:
•“C:\InetPub\Conquest III”
•to
•“C:\InetPub\Conquest\Test”
Step 4. In IIS create a new Web Site for the Test instance (version 3.0326) e.g.
•Web Site name “ConquestTest”
•Bind it to Port 90
•Set the Application path to “C:\InetPub\Conquest\Test”
•Set the Application Pool to “ConquestIII”
•Set the permissions for the new Web Site as per IIS Permissions
•Use the Conquest ‘Connections Utility’ (C:\InetPub\Conquest\Test\App_Admin\ConfigurationUtility.exe) to delete the “ConquestProduction” connection then create one to a “Test” copy of the Conquest database e.g. “ConquestTest”
•Start the “ConquestTest” Web Site
Step 5. a workstation with Silverlight 5.0, test the “ConquestTest” instance in Internet Explorer 9 or later, with this URL: http://AMCQ301:90 connecting to “ConquestTest”
Acceptance Testing proceeds on “ConquestTest” until the requirements have been met. At this point the production instance can be upgraded as follows:
Step 1. Advise the Asset Management staff that Conquest will be unavailable for a short period
Step 2. In IIS, stop the Web Sites:
•ConquestProd
•ConquestTest
Step 3. Step 3. Select the contents of Application path “C:\InetPub\Conquest\Production” except for:
•\App_Data\
Step 4. Delete the selected Files and Folders
Step 5. Copy the contents of Application path:
•“C:\InetPub\Conquest\Test”
•to
•“C:\InetPub\Conquest\Production” overwriting existing files
•Use the Conquest ‘Connections Utility’ (C:\InetPub\Conquest\Production\App_Admin\ConfigurationUtility.exe) to delete the “ConquestTest” Connection leaving just “ConquestProduction”
•Start the Web Sites, which are now both running version 3.0326
Step 6. The “ConquestProd” instance continues to be used with URL: http://AMCQ301 and connecting to “ConquestProduction”
Step 7. The “ConquestTest” instance is finished with for testing until the next opportunity to upgrade
•Acceptance Testing can take many months of effort, especially in making sure that integrations continue to work smoothly. New features may become available in later releases of Conquest, for which it may be useful to set up another instance of Conquest for evaluation:
Step 1. Install the latest version of Conquest III e.g. version 3.0330. The install process will replace the existing “ConquestIII” Web Site and use the following defaults:
•Web Site name “ConquestIII”
•Application Pool name “ConquestIII”
•Port 89
•Application path “C:\InetPub\Conquest III”
Step 2. IIS stop the “ConquestIII” Web Site
Step 3. Copy its application path folder to a new path in the Asset Management Web Sites group e.g. from:
•“C:\InetPub\Conquest III”
•to
•“C:\InetPub\Conquest\Evaluation”
Step 4. In IIS create a new Web Site for the Evaluation instance (version 3.0330) e.g.
•Web Site name “ConquestEval”
•Bind it to Port 91
•Set the Application path to “C:\InetPub\Conquest\Eval”
•Set the Application Pool to “ConquestIII”
•Set the permissions for the new Web Site as per IIS Permissions
•Use the Conquest ‘Connections Utility’ (C:\InetPub\Conquest\Evaluation\App_Admin\ConfigurationUtility.exe) to delete the “ConquestProduction” connection then create one to an “Evaluation” copy of the Conquest database e.g. “ConquestEvaluation”
•Start the “ConquestEval” Web Site
Step 5. On a workstation with Silverlight 5.0, use the “ConquestEval” instance in Internet Explorer 9 or later, with this URL: http://AMCQ301:91 connecting to “ConquestEval”
Transport Layer Security (TLS-02)
•Add an HTTPS Binding on the Conquest III Web Site:
•Click the Add button
•Select HTTPS protocol
•Accept the default Port 443 or open a different Port, depending on requirements
•Select the installed Transport Layer Security (TLS-02) Certificate
•Click OK to save the Binding then use HTTPS protocol for the Conquest III URL e.g. https://MyConquestServer
How to Install Integration Modules
On receiving Integration files and documentation from Conquest Solutions, place the files in the Conquest III integration folders, as instructed:
•\Application Path\App_Data\ServerReference\
•\Application Path\App_Data\ClientReference\
How To Manage Connection Definitions
When Conquest III is installed for the first time, there are no connections.
Subsequent Conquest III uninstalls and installs to the same application path, location will reuse existing connection files.
When changing a Connection Definition it is worth checking to see if the Reporting Services address and Shared Data Source settings are still valid. See Reports.
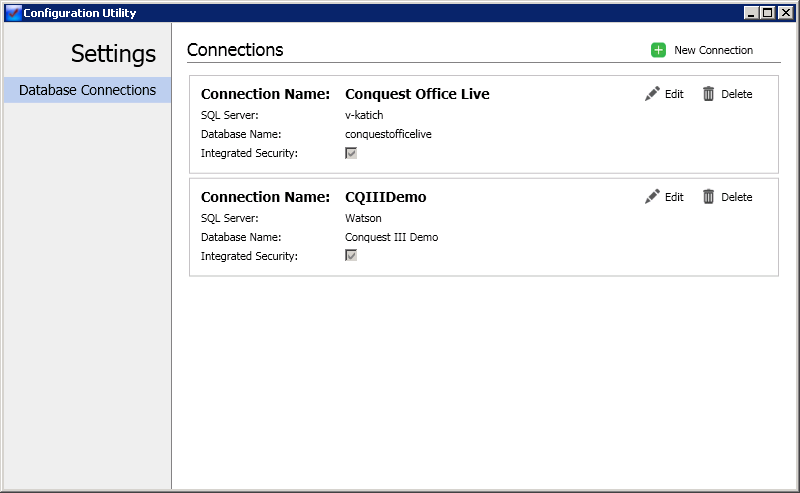
How To Edit a Database Connection
Open the Connections Utility and do one of:
•Click New (the green + button at the top right of the form) to create a completely new connection
•Select the Edit (pen) button on an existing connection to make changes to it
•Select the Delete (bin) button on an existing connection to remove it
In the Edit screen enter text for:
•The Connection Name
•Tick the Disable check box to retain a Connection but make it unavailable until it is required
•The name of the SQL Server
•The name of the Conquest database
•The type of security, which defaults to Integrated Security, so that the Windows account name that Conquest III connects with is also the Conquest user name
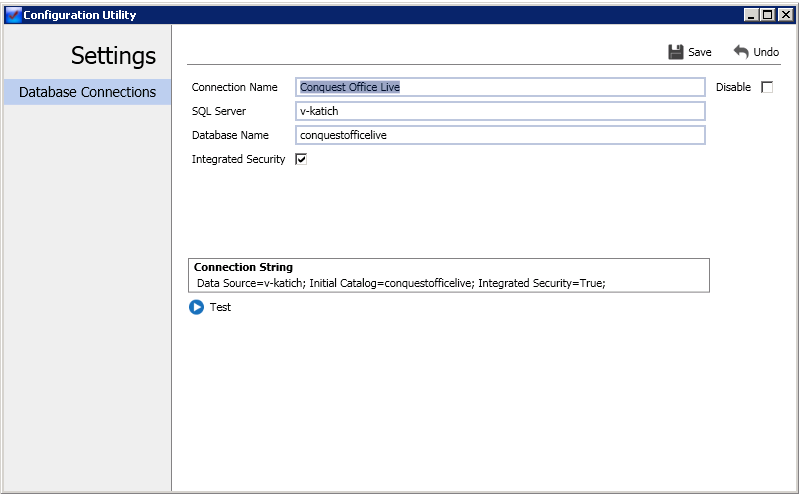
Check that the assembled connection data is correct by clicking the Test (Arrowhead) button
•If the test is successful, click the Save button
•If not then examine the names entered and make corrections before doing the Test and Save cycle again
•A connection that does not Test successfully can still be saved, so that other actions can be taken, to make it valid
•If the wrong connection is accidentally chosen and edits are made on it then, provided it has not been saved, the changes can be reversed by clicking the Undo (back arrow) button
To make a Connection for a non-Windows authenticated device, untick the Integrated Security check box:
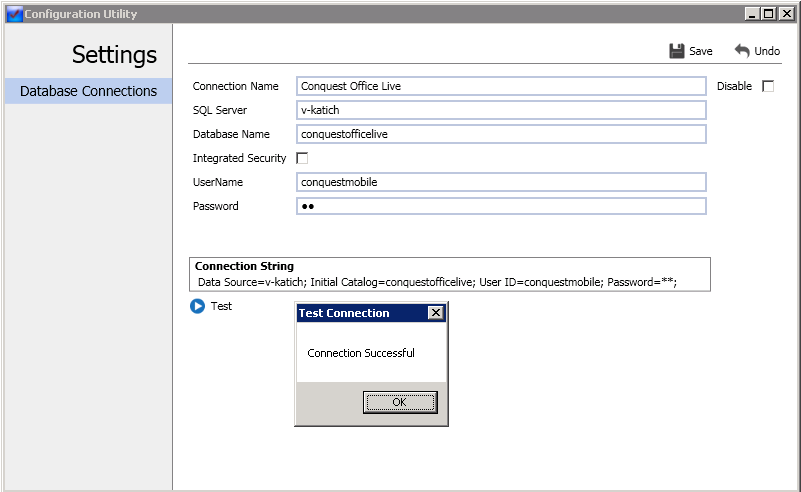
•Enter the SQL Server user name and password, which, when saved, are encrypted
•Save the connection as described above