How To Create a
Request
Requests can come into Conquest
from an integration with a Customer Request App, or they can be entered into the
Conquest Request
Form.
Enter a Request
Step 1. From the Tasks Window click on
New >
Request
Step 2. Fill in the
Request Form with
details provided by the requestor
Step 3. Optionally, assign
an Organisation
Unit by selecting from the ‘Organisation Unit’ drop-list or
use the one from the ‘Action Response’ Standard Action in step
4
Step 4. Optionally, use an
‘Action Response’ Standard
Action to create an Action for the Request, by selecting one from
the picklist. The Organisation
Unit from the Standard Action is then used
for the Request’s Organisation
Unit. You can do this at any time on an existing Request, by
selecting an ‘Action Response’ Standard Action then
clicking the Ellipsis
Button on the right of the picklist.
Step 5. If there are
directions on where to go to attend to the Request, put them into the Location
field
Step 6. Click on the
Send Email Task to
email the Request to the Organisation Unit
assigned
Step 7. Click
Save
Receive a Request
Step 1. Having received an
email for a Request, you can click on the Conquest Link, if there is
one in the email, or use the Find Tool to copy and
pasting the Request Reference ID field in from the email, which opens the
Request Form
Step 2. Click the Actions tab on the Request form to see details
of any Actions already assigned
Step 3. To create a new
Action on the Request, click the Create Task in the Actions tab. See Actions, and also How to Create an Action
Step 4. To Relate an
existing Action to the Request, click the Relate Task in the Actions tab, which opens the
Relate Form to
find the Action. You can do many of these
Step 5. Click
Save
Things to be aware
of:
The Organisational Hierarchy must already be set up, to allow
a Request to be assigned to the relevant staff-role or department. See How to Manage
Organisational Structure for more details.
To use Request Responses, you need
to set up Standard Actions
that have the ‘Request Response’ checkbox ticked, so that they show ‘Action
Response’ picklist.
The Email Merge Template must be configured before Emails can
be sent. See How to Use the Email Merge Editor for
more details.
To make best use of the Request features some Views for New,
un-Completed or overdue Requests for assignees will need to be created.
See How to Use the View
Manager for more details.
By using the ‘Relate Requests’ Task on the Action form or
‘Relate Action’ Task on the Request, one or more Requests can be linked to an
Action and one or more Actions linked to a Request.
Use the Customer Request form to record the details of any
request for work on an Asset, either from a customer or from another department
in the organisation. From such a Request, one or more Works Actions can be
created on the Asset that the Request is for, to manage and record the actual
work performed.
There are Options that your Administrator sets for Requests
that will affect how you use them:
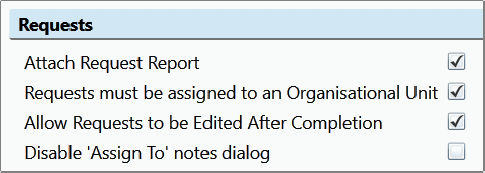
The first three are self explanatory but the last is less so.
What it can be used for is, when your Organisation Hierarchy is based on roles
rather than people and you select e.g. “Water Leaks Unit” as the assignee, you
may also want to put in a more personal comment e.g. “Emma Steed is nearest this
one”.