Conquest provides View’s, Query’s and Reports as the three main methods for extracting information. The filter builder is used in all three of them to choose the information required for display.

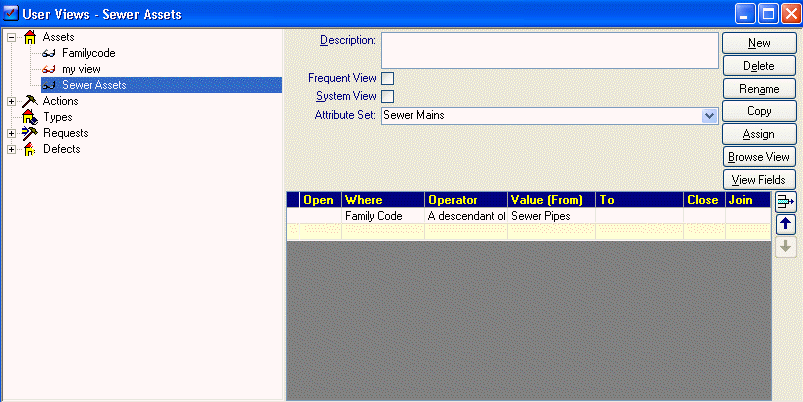
This is the View Manager Filter form. The Filter form uses the same standard design throughout Conquest but for other area’s it won’t have the 5 filter groups (Assets, Types. Actions, Requests, Defects) on the left for determining the type of filter. Filters created in there own specific forms, such as Batch Valuation, are created in the same way and are only available to run in their own form.
|
Field |
Description |
|
Filter Selection |
The five groups each list filters created to list data of their type. I.E. Asset filters will list Asset Data as determined by the actual filter created. |
|
Description |
This is for a more detailed description of what this filter does. |
|
Frequent View |
This Checkbox determines if this view is one of your "Favourites". Favourites appear in the user views drop down list in the main Conquest Toolbar. They can be selected from this List and run without opening the View Manager. |
|
System View |
Unless this box is checked then this view will only be available to the user who created it. |
|
Attribute Set |
This pick list lets you select an Attribute set to use for your filter. Using an Attribute set will reduce the returned record list to only Assets of that Attribute Set but it does mean that the Attribute Set Field names will be used rather than the standard (usertext1, userrtext2) field names. |
|
Action Category |
If this is an Actions View then this pick selector will be available. Selecting an Action Category from this selector will automatically filter the result to only include Action’s of this Action Category. An additional advantage is that the field names in the Field selection lists now have the corresponding Action User Field labels rather than the generic Conquest field names. |
|
Copy Button |
This button will copy the current filter and create a new one with the name “Copy of #name of old filter#” |
|
Assign Button |
This button allows the transferring of Views between Users, this can let another user setup a filter for someone else without having to log-in to Conquest as that person. |

This section is where each line of the filter is created.
|
Field |
Description |
|
Open |
Any opening brackets required for this filter would be recorded in this column. |
|
Where |
This drop down displays two columns. The first is a list of all the fields that available to be chosen. The second is the table from which the field comes. Good fields to choose are code field such as Family Code and Type Code because they will allow you to choose from a hierarchy rather than remember exact text or numbers. |
|
Operator |
This drop down lists all the different expressions that can be used such as ‘Like’, ‘Equal to’, ‘Greater Then’ etc. If you selected a Code field to filter on then ‘A Descendant of’ will be available this is useful for choosing all the children of a particular entry in a hierarchy. |
|
Value |
This is the particular value you wish to find. If your field was a date then you can choose from a list of standard dates, from any other Date field in the field list or type in a date manually. If your field was a Code then you can pick from the relevant hierarchy. And if your field was one of Conquests drop down lists then the values from that list will be available to pick from. |
|
To |
If the Operator is ‘between’ then the ending value is recorded here. (For example ‘between 1 and 5’ the 1 would be in the value column and the 5 would be in this column). |
|
Close |
Any closing brackets required for the filter would be put here. |
|
Join |
This box joins this line to the next; the options are and/or. |
On the right hand side of the Criteria Description there is a Remove line button. This button will delete the currently selected line of the criteria.
The Order by fields let you sort the Result set by any of the fields applicable.
Once your Criteria have been created you select the Browse View button to View the results of your filter.